Soil sampling in dry conditions can be difficult. The ground is hard, fields are dry, and getting a consistent soil core depth can take more time than usual. To help you take the best soil samples this fall, we’ve put together some tips and tricks for sampling in dry soil conditions that, when implemented, will help you save time and frustration in the field.
Soil sampling equipment
AGVISE Laboratories has provided soil sampling equipment for over 40 years. Our hydraulic soil sampling system will enable you to get high-quality soil cores, even in hard, dry soils. The electric-hydraulic power unit paired with easy-to-change Quicktach probes will make adapting to challenging soil sampling conditions simple and easy. You can find more about our equipment on our online store.
Best soil probe body
The heavy-duty (HD) probe body is made from chromoly steel. This thick-walled, hard steel probe body will resist bending under hard, dry, or frozen soil conditions (compared to softer stainless steel). The HD probe body comes in two options: solid and slotted. If the topsoil is powder dry, it is best to use the HD solid probe body, as powder-dry soil may fall out of the slot. Stainless steel probe bodies work great in most situations but in hard, dry soils the stainless-steel probe body may bend more easily than the HD probe body.
Best soil probe tip
AGVISE Laboratories carries two tips for the HD probe body. The HD “dry tip” has a sharp cutting edge and large opening (3/4-inch) that works great in hard, dry soils. It is our leading recommendation for such conditions. If you are soil sampling fine-textured clay soils, even under dry conditions, the HD “wet tip” may also work well for you because there is usually a little moisture remaining at the lower end of the 24” soil profile. It is a good idea to have both the HD dry and HD wet tips with you in the sampling rig. As soil conditions change, you can use the soil probe tip that gives you the best quality soil cores. 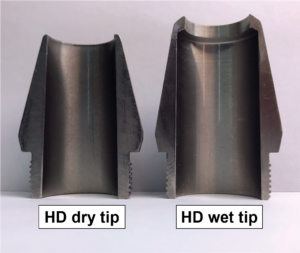
Solving common very dry soil sampling problems
What do I do if the soil probe comes up empty?
Under very dry soil conditions, sometimes the soil probe comes up empty because soil falls out the bottom of the probe. One trick to overcome this is to push the probe all the way to 24-inch (or to the end of its cycle), then lift the probe up a few inches and push it back down to 24-inch. This creates a slight plug at the bottom of the soil core that prevents soil from falling out the bottom. It seems like such a simple solution, but it works!
What if I can’t get full 24-inch soil cores and the soil probe tip has a hard plug in it, which is preventing soil from flowing into the probe body?
You are probably using a tip with an opening diameter that is too small. Dry soil does not compress well and sometimes it will not flow through a smaller tip opening. The HD dry tip has a 3/4-inch that is large enough to allow dry soil to flow into the soil probe.
Will WD-40 help me get better quality soil cores if the soil is dry and hard?
There is no benefit to using a lubricant such as WD-40 under very dry soil conditions. Dry soil is much less likely to plug the soil probe than wet soil. If you are running into a few plugged tips with the HD dry tip, try the HD wet tip. You are probably finding a layer of wet soil deeper in the soil profile. The HD wet tip has a recessed lip that will prevent plugging and will handle this layer better than the HD dry tip.
What if I can’t get a full 6-24-inch soil core? Should I change anything in the information I submit to the laboratory?
If you are unable to get a full second soil depth (6-24-inch soil core), it is important that the information you submit to the laboratory matches the soil depth you actually collected. Mobile soil nutrients like nitrate-nitrogen are tested on the second soil depth and results are calculated based on soil core length. If the soil core is shorter than what was written on the submission form or submitted in AGVISOR, the soil test nitrate-nitrogen result will be overestimated.
Preventing fires when soil sampling
No one wants to start a fire while in the field. Unfortunately, driving anything with an engine over dry crop residue creates a fire risk. John Lee, soil sampling and testing veteran, has seen this happen firsthand. “I started a corn stalk field on fire when I was soil sampling one of my dad’s fields in college,” said Lee. “The fire was put out quickly, but I was embarrassed that I did not have anything in the truck with me to put the fire out.”
After visiting with several customers with many years’ experience soil sampling in dry conditions, we compiled a list of practices that can reduce the chance of fire while soil sampling.
Fire suppressing items to keep in your soil sampling rig
Remember that most fires start under the truck where straw or chaff accumulates on exhaust pipes, mufflers, etc. Your firefighting equipment needs to be long enough to reach these areas if a fire does start.
- Large ABC type fire extinguisher with hose
- 10 lb size costs ~$70.00; large 20 lb size costs ~$130.00
- Water tank with 20-ft hose
- A small water tank (~25 gallons) with a 20-ft hose will allow you to get to any location on the truck to put out a fire. One sampler suggested using a small spray tank system designed for ATVs. The systems cost roughly $350-$450, are self-contained, and run from a battery. You may already have a small weed spraying system you can put in the box of your soil sampling truck to use as a firefighting system.
Practices to reduce fire risk before one starts
- Soil sample in the morning when it is cool and overnight dew is still present
- Talk with your clients about reducing stubble height. This should not be an issue with drought-stressed crops because the stubble height will be shorter than normal.
- Keep as much ground clearance under your truck as possible to prevent chaff buildup on the frame, axels, and crossmembers.
- Inspect your truck at the end of each day to make sure straw and chaff are not accumulating in places that could start a fire the next day. Use an air compressor to blow out all the nooks and crannies accumulating crop residue.
- Stay alert for any hints of smoke while soil sampling. At the first hint of smoke, find where the smoke is originating quickly and extinguish it, or get out of the field and into a safe area to figure out where the smoke is coming from.
Banding Phosphorus and Potassium: Stretch your fertilizer dollars further
in Fertilizer Placement, Phosphorus, Potassium/by John BrekerThis article originally appeared in the AGVISE Laboratories Winter 2022 Newsletter
Broadcast or band? For phosphorus and potassium, these are big fertilizer questions. In recent months, high fertilizer prices have prompted farmers and agronomists to consider other strategies to reduce fertilizer costs without jeopardizing crop yield. Among the most common and effective options is placing fertilizer in a tight band below the soil surface, also known as a subsurface band.
Subsurface banding helps improve fertilizer recovery and efficiency. It ensures that fertilizer is placed in the plant root zone, facilitating direct uptake of crop nutrients. It also minimizes potential fixation reactions (aka tie-up) that reduce soil nutrient availability, allowing more phosphorus or potassium to remain available in soil for plant uptake. You ultimately get more bang for your buck on each pound of fertilizer applied. In addition, placing fertilizer below the soil surface protects fertilizer from
Idealized crop response to phosphorus as affected by fertilizer placement and soil test level (figure from J. Prod. Agric. 1:70-79).
soil erosion and runoff losses via wind and water. This is important for fall-applied phosphorus and potassium because spring snowmelt runoff and wind erosion can move fertilizer lying on the soil surface from neighbor to neighbor and watersheds beyond.
When we discuss banding phosphorus and potassium, it also comes along with the question, “How far can I cut fertilizer rates?” It is important to recognize that the improved efficiency of banding over broadcast is a function of soil test levels (figure) and proximity to the seed row. If you have high soil test levels (>15 ppm Olsen P), then the expected crop yield response to fertilizer, whether broadcast or banded, is lower. Banding fertilizer still helps with the fertilizer recovery, but the expected crop yield increase is often similar to broadcast. However, if you have low soil test levels, then the expected crop yield response is much greater with banding.
Where does seed row proximity fit in? The greatest efficiency comes with in-furrow or near-seed placement (e.g. 2×2 band), allowing effective fertilizer rates of one-half to two-thirds their broadcast equivalent. The near-seed placement also provides the starter effect, which enhances early plant growth and development in cool, wet soils of the upper Midwest and northern Great Plains. Of course, you must watch seed safety with any seed-placed fertilizer in the furrow.
For deep-band or mid-row band placement, the benefits over broadcast begin to disappear. These are still great placement options for anhydrous ammonia or urea, but the greater distance between the seed row and fertilizer band does not provide the same efficiency for immobile soil nutrients like phosphorus and potassium. This will surprise some people hoping that strip-till with deep-banded phosphorus and potassium or a one-pass air seeder with mid-row banders might be their answer to reducing fertilizer costs. For these “far-from-seed” banding options, reduced fertilizer rates are not suggested, and some in-furrow or near-seed banded fertilizer should still be applied for the current crop.
Controlling Soybean Cyst Nematode: Do you have a resistance problem?
in Disease, Regional Data, Research, Soybean/by Brent JaenischThis article originally appeared in the AGVISE Laboratories Winter 2022 Newsletter
This is the third year of our soybean cyst nematode (SCN) resistance project. Each year, we have flagged spots in soybean fields and collected paired SCN soil samples in June and September. If the SCN egg count increases through summer and into fall, we can quickly learn if the soybean SCN-resistance source, either PI88788 or Peking, is working or failing. University SCN surveys have found that the PI88788 resistance source has begun to lose its effectiveness at controlling SCN populations in much of Minnesota. This is a particular problem because 95% of SCN-resistant soybean varieties still use the PI88788 resistance source.
In 2021, paired soybean variety comparisons with SCN soil samples and soybean yield data really helped us see the difference in these SCN resistance sources. Among the sites, the Peking resistance source always had a lower SCN egg count than the PI88788 comparison, indicating that the Peking soybean varieties had better control of the SCN population at 4 of 5 sites. The Alberta site had similar SCN population control with both PI88788 and Peking resistance sources, so the soybean yield was similar at the site. However, the other sites demonstrated SCN resistance to PI88788, and the resulting soybean yield with the Peking resistance source was better with 7-bu/acre soybean yield increase on average.
For 4 of 5 sites, it is apparent that a Peking-traited soybean variety is the better choice. To learn if you have SCN resistance problems in your field, the simple early-late SCN soil sampling exercise, like we did in this project, is a quick way to learn if your current soybean variety is still controlling SCN and delivering the best soybean yield.
How much residual soil nitrate is left after the 2021 corn crop?
in Corn, Drought, Nitrogen, Regional Data, Soybean/by Jodi BoeIt’s probably more than you think.
So far, the residual soil nitrate-nitrogen trend following corn is much higher than average across the upper Midwest and northern Great Plains. This follows the same trend set by the 2021 wheat crop. For many growers in the region, the hot and dry growing season has resulted in high residual soil nitrate-N carryover where corn yield was lower than average. An update on average residual soil nitrate-N after grain and silage corn, broken into zip code areas, can be found below (Table 1). This data highlights the importance of soil sampling for nitrate-N, even after high N-requirement crops you may not think of leaving much residual soil nitrate-N behind.
The early soil nitrate-N trend data gives us a snapshot of the soil samples that AGVISE has analyzed so far. The average soil test data is not a replacement for actual soil test results on your fields or your clients’ fields. There is considerable variability within a single zip code area, with some corn fields having less than 20 lb/acre nitrate-N and many other fields that are much higher. Take a look at eastern South Dakota, the Sioux Falls and Watertown areas have over 49% of soil samples with more than 100 lb/acre nitrate-N (0-24 inch soil depth). Considering sky-high nitrogen fertilizer prices (and still rising), it makes sense to soil test for nitrate-N and credit it toward next year’s crop nitrogen budget.
Agronomic considerations for soybean in 2022
One crop that will not benefit from extra residual soil nitrate-N after corn is soybean. Soybean can create its own nitrogen thanks to a symbiotic relationship with nitrogen-fixing bacteria. The nitrogen fixation process takes energy, however, and if there is already ample plant-available nitrate in the soil, soybean will delay nodulation and take advantage of the free nitrate. Delayed nodulation may ultimately lead to soybean yield loss.
High residual soil nitrate-N can also increase soybean iron deficiency chlorosis (IDC) severity. Soybean IDC is a challenge for growers in the upper Midwest, northern Great Plains, and Canadian Prairies, especially on soils with high carbonate and salinity. If soil nitrate-N is also high, research has shown it can make soybean IDC even worse and result in lower soybean yield. If you plan to grow soybean on fields with high residual soil nitrate-N, seriously consider IDC-tolerant soybean varieties or consider planting them on fields with lower residual soil nitrate-N.
Should a corn-corn rotation be considered after a drought year and high soil nitrate?
Planting a second corn crop would allow a producer to capture this “free” nitrate-N in the soil profile. However, planting corn on corn has many challenges from soil moisture to insect pressures (e.g. corn rootworm). The 2021 corn crop started the growing season with a full profile of water (due to excessive moisture in 2019 and adequate moisture in 2020) and ended with enough to push the corn crop through harvest. Going into the 2022 growing season, plant available water will be considerably less than the beginning of 2021. If the drought continues into 2022, remember that corn requires more moisture than soybean, so planting corn on corn means putting a higher water-requiring crop on ground that had less water to start with (versus corn following soybeans). Less available moisture, combined with other agronomic pressures, may mean less than expected yield for a corn-on-corn rotation.
Soil Sample Before Tillage: Consistent sample depth matters!
in Phosphorus, Potassium, Soil Sampling, Zinc/by Jodi BoeThe fall harvest season is a busy time of year. Farmers need to finish harvest, apply fertilizer, and complete any tillage operations before the long winter sets in. Another field operation that needs to be completed within this flurry of activity is soil sampling, and sampling timing is crucial to getting quality and consistent soil cores.
Do your best to soil sample fields before any tillage pass. Tillage makes collecting soil cores with consistent depths very difficult, which can affect test results. Soil test results are only as reliable as the soil samples that were collected from the field. If a sample is submitted as a 0 to 6-inch sample and is only really the top 0 to 4-inch of the soil, soil test values are inflated compared to actual 0 to 6-inch results. The opposite happens if a core is actually deeper than the 0 to 6-inch depth: soil test values are diluted if the sample that was submitted is deeper. The table below shows an example of how test levels of non-mobile nutrients like P, K, and Zn decrease as soil core length increases.
Why tillage affects sampling depth consistency and core quality
Tillage breaks apart soil and introduces air, essentially “fluffing” the soil. Sampling after the soil has been “fluffed” means the sampler has to guess what actually represents a 6-inch soil depth for that field. What was a 0 to 6-inch core in the soil probe before tillage might actually take up 8 inches in the soil probe now, given the soil profile is now “fluffy” after tillage. Over time the soil will settle, but when does that happen? How fast does that happen? When will 0 to 6 inches of tilled soil in the soil probe actually represent a 0 to 6-inch depth again? No one can accurately answer these questions.
Beyond the soil being “fluffy” after tillage, tillage loosens soil aggregates, makes clods, and generally dries the soil. This means loose soil may fall out of the probe or the probe pushes around the clods at the surface and does not get a true 0 to 6-inch sample. This might mean a core that’s collected and sent to the laboratory might actually be a 2 to 8-inch depth core, or a 2 to 6-inch depth core.
A tip for sampling after tillage
If you have to sample after tillage, sample in the wheel track. The tire compresses the soil and allows you to get a better opportunity at a true 0 to 6-soil core depth.
Getting consistent soil core depths is crucial. Sampling before tillage is the best thing you can do to ensure quality cores with consistent depths. Sampling after tillage can result in lower test levels for non-mobile nutrients like P, K, and Zn. Please call either AGVISE laboratory and ask for one of our technical support staff if you have any questions about sampling after a field has been tilled.
Corn Stalk Nitrate Test
in Corn, Nitrogen, Plant Analysis/by Richard JennyTo help evaluate nitrogen management in corn, you may want to try the corn stalk nitrate test as a post-mortem tool. The corn stalk nitrate test is a late-season or end-of-season plant analysis on mature corn stalks. Iowa State University developed the corn stalk sampling protocol and interpretation. If corn did not have sufficient nitrogen, the corn stalk nitrate level will be low. If corn had excess nitrogen, the corn stalk nitrate level will be high.
The corn stalk nitrate test can be useful in cropping systems with manure or corn-after-alfalfa, where a significant portion of the crop nitrogen budget comes from nitrogen mineralization. It is also helpful in more humid climates, where the residual soil nitrate-nitrogen test is not utilized. For corn silage production, it is easy to collect corn stalk samples on the go during silage harvest, making it a quick and useful tool.
Since the corn stalk nitrate test is a post-mortem tool with the goal to provide information for future years, it is not recommended in years with abnormal precipitation. In drought years, potential crop productivity is reduced, so the plant nitrogen requirement is lower than normal. In high precipitation years, soil nitrogen losses will reduce the available nitrogen supply. As a result, the corn stalk nitrate level can be very high in drought years or very low in wet years. Such results say more about environmental conditions, not the adequacy of the nitrogen fertilizer program.
When to sample
How to sample
Table 1. Corn Stalk Nitrate Test Interpretation
Corn stalk sampling instructions for end-of-season corn stalk nitrate test (from Iowa State Univ. Ext. Circ. CROP 3154, 2018).
Soil Nitrogen Trends – Fall 2021; High Variability Following Drought
in Canola, Corn, Drought, Nitrogen, Regional Data, Soybean, Wheat/by Jodi BoeThis article was originally published following the 2021 drought.
The 2022 growing season may seem like a long way off, but spring will be here before we know it. In fact, many growers are already making (or have made) crop choices and seed variety decisions for 2022. One factor that must be considered when making crop and variety selections for 2022 is residual soil nitrate-nitrogen following the 2021 growing season. For many in the northern Great Plains and Canadian Prairies, the 2021 growing season was hot and dry, which resulted in high residual soil nitrate levels following many crops. An update on average residual nitrate levels after wheat, broken down by geography, is below (Table 1). Residual soil nitrate-nitrogen following other crops, including soybean, are also higher than average (Table 2). This highlights the importance of soil sampling, even after crops we do not typically think of leaving high residual soil nitrate behind.
The data in the tables represents a snapshot of the samples we have tested so far this fall. While the average residual soil nitrate-nitrogen for an area may be interesting to talk about, it is not a replacement for actual soil test results from you or your growers’ fields. The data shows that over 30% of the wheat fields in many areas (see the right-hand column of the table) test over 100 lb/acre soil nitrate (0-24 inch depth). Droughts like 1988 and 2021 are very uncommon and leave us in situations that we are not used to dealing with. Using an average soil nitrate level from a region to decide an N rate on an individual field would be like deciding to apply an insecticide on every acre of the farm without even looking at each field to see if the insect is present. You need actual soil test data on each field to make informed decisions.
Table 1. Residual nitrate trends as of Sept. 17, 2021 from more than 20,000 soil samples taken after wheat. Regions with less than 100 soil samples are not included in the table.
Table 2. Residual nitrate trends as of Sept. 17, 2021 for crops other than wheat. Regions with less than 100 soil samples for each respective crop are not included in the table.
High Fertilizer Prices
According to the September 15, 2021 DTN fertilizer price survey, retail fertilizer prices continue to rise. The average price per pound of nitrogen by fertilizer product is $0.61/lb N for urea, $0.46 lb/N for anhydrous ammonia, and $0.66/lb N for UAN-28. This represents a 55%, 73%, and 71% increase in price compared to prices for the same fertilizers this time last year. Long story short, fertilizer is expensive. High residual soil nitrate following wheat may help reduce input costs in 2022, as long as you know what the residual soil nitrate in your fields is and take advantage of it by growing a crop that requires nitrogen fertilizer. If you have a soil nitrate test of 80 lb/acre (0-24 inch) after wheat, that is about 50 lb more than normal carry over. The extra 50 lb/acre soil nitrate is worth $30.00/acre (based on the current urea price).
Brent Jaenisch Joins AGVISE Technical Support Team
in AGVISE Laboratories/by Jodi BoeAGVISE Laboratories is proud to announce that Brent Jaenisch has joined the AGVISE team as an Agronomist. Brent provides sales and technical support to AGVISE customers throughout Minnesota, South Dakota, and the northern Corn Belt. You will soon see his contributions in AGVISE newsletters and seminars. Brent is based at the Benson, MN laboratory.
Brent is a Minnesota native and grew up on a diversified grain and livestock operation outside Maynard, MN. Brent took his passion for farming and agriculture to school, obtaining a degree in Agronomy from the University of Nebraska-Lincoln, then a M.S. and Ph.D. in Agronomy from Kansas State University. Brent’s master’s degree research investigated wheat yield response to different fertilizer treatments and varying agronomic practices. His doctoral research evaluated wheat management practices in Kansas where he spent countless hours surveying wheat growers across Kansas and understanding the contribution of wheat yield components to wheat yield.
Brent enjoys interacting with agronomists and farmers, and has extensive experience leading and instructing research teams. Brent spent three summers of his undergraduate experience interning with CHS and Winfield in Minnesota, where he built lasting relationships with growers and retail agronomists. During his graduate school career, Brent trained, coordinated, and lead teams of new agronomists to complete field work and research tasks across the state of Kansas, which is no small feat!
Brent’s practical approach to agronomy, passion for teaching, and knack for building meaningful relationships make him an excellent addition to the AGVISE technical support team. We are excited to have him on the team and can’t wait for you to meet him.
Understanding high residual soil nitrate-nitrogen following drought
in Drought, Nitrogen, Regional Data/by John LeeSoil testing after small grains is well underway, and we are seeing higher than normal soil nitrate-nitrogen levels, as expected. Crop yields have varied from much below average to surprisingly decent in some locations. It is easy to understand why residual soil nitrate-nitrogen is high in fields where the 2021 drought was severe and crop yield was very low. It is a little harder to understand how some fields, that produced decent crop yields, can also have higher than normal soil nitrate-nitrogen as well. Given the variability we are seeing across the region, the only way to know whether or not your fields have higher-than-expected residual soil nitrate-nitrogen or not is to sample and test these fields.
We will attempt to answer some of the questions about “Where did all the soil nitrate-nitrogen come from?” and “What should we do next year?” farther down.
2021 Residual Soil Nitrate-Nitrogen Summary, Early Report (First 6,500 Fields)
AGVISE has tested over 6,500 soil samples from wheat fields across the region so far. We usually wait to share the early soil nitrate-nitrogen summary until September, but we have been getting a lot of questions already. The table shows the average soil nitrate-nitrogen (0-24 inch soil profile) and the percentage of soil samples in each category for several areas of Manitoba, Minnesota, North Dakota, and South Dakota. As you can see, there is considerably more residual soil nitrate-nitrogen than the long-term average of 30 to 45 lb/acre nitrate-N in a good year. In some areas, over 30 to 50% of soil samples have more than 80 lb/acre nitrate-N (0-24 inch) remaining after wheat.
Reasons for high residual soil nitrate-nitrogen in a drought with low crop yield
Where did high residual soil nitrate-nitrogen come from in fields that had decent crop yields?
In 2021, crop water use demanded a lot of stored soil water uptake from deeper in the soil profile. If the crop was able to root down deep enough and fast enough, the crop found additional water in the subsoil along with nitrate-nitrogen from previous years. With the extra water and nitrate found in the deep subsoil (below 24 inches), the resulting crop yield surprised many farmers and agronomists. Just because we do not routinely collect soil samples below the 24-inch soil depth in most areas does not mean there is zero nitrate-nitrogen down there. After a series of wet years, the amount of nitrate-nitrogen that can accumulate in the lower soil profile can be considerable. In a drought year, when all crops were forced to root deeper just to survive, the deep nitrate-nitrogen makes a significant contribution to the total plant nitrogen uptake.
What about the nitrogen fertilizer that was applied last spring and all the nitrate-nitrogen in the topsoil (0-6 inch soil profile)?
With the very dry topsoil conditions, plant roots grew deeper in search of water. Since plant roots obtain most nitrate-nitrogen through mass flow in soil water, this situation left fertilizer nitrogen “stranded” and positionally unavailable near the soil surface. Although this was bad for this year’s crop, the “stranded” nitrogen is in a good position for next year’s crop. We experienced the same phenomenon in 2017 and 2018, after some areas had experienced a severe drought. There were fields with decent crop yields and considerable “stranded” nitrogen, just like this year.
Strategies to utilize high residual soil nitrate-nitrogen for next year
With so many wheat fields with high residual soil nitrate-nitrogen this fall, you may want to consider changing your crop rotation. Severe droughts like 1988 and 2021 are not very common, so we need to think outside the box. It is common for wheat to be followed in the crop rotation with a legume like soybean or dry edible bean. However, the drought has left you with a lot of residual soil nitrate-nitrogen, and nitrogen fertilizer prices are staggeringly high right now. If you have 100 lb/acre nitrate-N (0-24 inch soil profile), that is $60 per acre of “free” nitrogen fertilizer at current urea prices ($550/ton). In addition, excess soil nitrate-nitrogen can also make soybean iron deficiency chlorosis (IDC) worse on moderate to high IDC risk soils. Do you want to sacrifice $60 per acre of “free” nitrogen AND risk lowering soybean yield due to more severe soybean IDC?
Drought can be sporadic or continue for multiple years. You may want to consider more short-season crops in the crop rotation that require less water and can produce well in drier years (remember, we used most of the stored soil water in 2021). Short-season crops to consider include winter wheat, spring wheat, durum wheat, barley, canola, etc. It is also important to consider the current price for each crop. With high crop prices right now and promising futures prices in 2022, you could lock in some good prices for next year. Although two consecutive years of the same crop (e.g. wheat) is not ideal for disease management, there was very little disease in 2021, and it might allow some different weed control options for future crops in the rotation. All in all, a drought brings opportunities to think outside the box.
Sampling Fields for Soybean Cyst Nematode (SCN)
in Disease, Soybean/by Richard JennySoybean cyst nematode (SCN) is a microscopic parasitic worm that attacks the roots of susceptible soybean and dry edible bean, causing unseen or unexplained yield losses. Soybean and dry edible bean are naturally susceptible to SCN, but through plant breeding, most soybeans have some level of resistance, varying in level from good to poor. The most common source of resistance to SCN in soybean is PI88788, which is about 30 years old, and many soybean growing areas have SCN populations that are becoming resistant to this source. The Peking source is a very effective SCN resistance source but is only available in less than 5% of all soybean varieties.
Soybean cyst nematode cysts each harbor hundreds of eggs. Cysts and eggs of SCN can survive in the soil and remain viable for many years even without a soybean or dry bean host. Any activity that moves soil around will move SCN, meaning that areas with a history of soybean production likely have or will have this pest. Soybean cyst nematodes were first reported in Minnesota in 1978, South Dakota in 1995, North Dakota in 2003, and Manitoba in 2019.
During the growing season, the developing SCN cysts containing the eggs can be seen on susceptible plant roots, as seen in the picture below. To get an accurate assessment of the infestation level of the field, you need to collect soil samples and submit them to a laboratory to get a measure of the SCN egg count.
Sampling strategies
If you have never tested for SCN before, you will want to sample fields intended for soybean or dry bean for the presence of SCN and gather a baseline SCN egg count. The best time to collect this sample is at the end of the growing season, right before harvest or just after (before any tillage). Sampling in the fall coincides with the highest egg levels in the soil and typically falls in the months of September and October. Collect 10-20 soil cores (6 to 8 inch soil depth) right in the soybean row from areas of the field that are likely to have SCN. Since SCN is a soil-borne pathogen, it moves wherever contaminated soil can enter the field. Therefore, the areas you will want to collect samples from are field entry points where soil can be transferred on equipment and tires, places where blown soil accumulates (e.g., fence lines), ditches and flooded areas, and locations in fields with consistently low soybean yields. Mix the soil cores together and take a subsample to fill a soil sample bag.
If you know you have SCN, you will want to sample soybean fields twice during the year: once in June to get an initial SCN egg count and then again in the fall to get a final SCN egg count. The early and late SCN samples allow you to measure if SCN populations are being effectively controlled (i.e., no increase in SCN egg count) or if the soybean variety SCN resistance source is failing (i.e., SCN egg count increases). Choose a single point in the soybean field and collect 8-10 soil cores (6 to 8 inch soil depth) taken within the soybean row at that spot. Mix the cores together and fill a regular paper soil sample bag. Mark that point with a flag and collect its GPS coordinates. Come back to that exact spot in the fall and collect a second sample. This will help you assess how your SCN management strategies, including the soybean variety SCN resistance source and soybean seed treatment, are working in the field.
Preparing and sending SCN samples to AGVISE Laboratories
You can submit SCN samples via paper submission form or online in the AGVISOR portal. AGVISE provides special paper submission forms for SCN samples (bright yellow sticker) at no charge. The bright yellow forms and stickers help us sort samples and ensure samples submitted for SCN analysis are not dried and ground. All SCN samples analyzed by AGVISE Laboratories are analyzed at the Benson, MN laboratory. You can send the SCN samples directly to the Benson location, or to the Northwood location, where we will route the SCN samples to Benson for analysis. AGVISE Laboratories reports SCN results in “eggs/100 cc” of soil and provides interpretation on our reports informed by university research.
Helpful links:
Soybean Cyst Nematode Resource Compendium, Iowa State University
Soybean Cyst Nematode (SCN) Management, Univ. Minnesota
Soybean Cyst Nematode, NDSU
Soybean Cyst Nematode in South Dakota: History, Biology, and Management, SDSU
The SCN Coalition Website
Tips for Soil Sampling in Dry Conditions
in Drought, Equipment, Soil Sampling/by John LeeSoil sampling in dry conditions can be difficult. The ground is hard, fields are dry, and getting a consistent soil core depth can take more time than usual. To help you take the best soil samples this fall, we’ve put together some tips and tricks for sampling in dry soil conditions that, when implemented, will help you save time and frustration in the field.
Soil sampling equipment
AGVISE Laboratories has provided soil sampling equipment for over 40 years. Our hydraulic soil sampling system will enable you to get high-quality soil cores, even in hard, dry soils. The electric-hydraulic power unit paired with easy-to-change Quicktach probes will make adapting to challenging soil sampling conditions simple and easy. You can find more about our equipment on our online store.
Best soil probe body
The heavy-duty (HD) probe body is made from chromoly steel. This thick-walled, hard steel probe body will resist bending under hard, dry, or frozen soil conditions (compared to softer stainless steel). The HD probe body comes in two options: solid and slotted. If the topsoil is powder dry, it is best to use the HD solid probe body, as powder-dry soil may fall out of the slot. Stainless steel probe bodies work great in most situations but in hard, dry soils the stainless-steel probe body may bend more easily than the HD probe body.
Best soil probe tip
AGVISE Laboratories carries two tips for the HD probe body. The HD “dry tip” has a sharp cutting edge and large opening (3/4-inch) that works great in hard, dry soils. It is our leading recommendation for such conditions. If you are soil sampling fine-textured clay soils, even under dry conditions, the HD “wet tip” may also work well for you because there is usually a little moisture remaining at the lower end of the 24” soil profile. It is a good idea to have both the HD dry and HD wet tips with you in the sampling rig. As soil conditions change, you can use the soil probe tip that gives you the best quality soil cores.
Solving common very dry soil sampling problems
What do I do if the soil probe comes up empty?
Under very dry soil conditions, sometimes the soil probe comes up empty because soil falls out the bottom of the probe. One trick to overcome this is to push the probe all the way to 24-inch (or to the end of its cycle), then lift the probe up a few inches and push it back down to 24-inch. This creates a slight plug at the bottom of the soil core that prevents soil from falling out the bottom. It seems like such a simple solution, but it works!
What if I can’t get full 24-inch soil cores and the soil probe tip has a hard plug in it, which is preventing soil from flowing into the probe body?
You are probably using a tip with an opening diameter that is too small. Dry soil does not compress well and sometimes it will not flow through a smaller tip opening. The HD dry tip has a 3/4-inch that is large enough to allow dry soil to flow into the soil probe.
Will WD-40 help me get better quality soil cores if the soil is dry and hard?
There is no benefit to using a lubricant such as WD-40 under very dry soil conditions. Dry soil is much less likely to plug the soil probe than wet soil. If you are running into a few plugged tips with the HD dry tip, try the HD wet tip. You are probably finding a layer of wet soil deeper in the soil profile. The HD wet tip has a recessed lip that will prevent plugging and will handle this layer better than the HD dry tip.
What if I can’t get a full 6-24-inch soil core? Should I change anything in the information I submit to the laboratory?
If you are unable to get a full second soil depth (6-24-inch soil core), it is important that the information you submit to the laboratory matches the soil depth you actually collected. Mobile soil nutrients like nitrate-nitrogen are tested on the second soil depth and results are calculated based on soil core length. If the soil core is shorter than what was written on the submission form or submitted in AGVISOR, the soil test nitrate-nitrogen result will be overestimated.
Preventing fires when soil sampling
No one wants to start a fire while in the field. Unfortunately, driving anything with an engine over dry crop residue creates a fire risk. John Lee, soil sampling and testing veteran, has seen this happen firsthand. “I started a corn stalk field on fire when I was soil sampling one of my dad’s fields in college,” said Lee. “The fire was put out quickly, but I was embarrassed that I did not have anything in the truck with me to put the fire out.”
After visiting with several customers with many years’ experience soil sampling in dry conditions, we compiled a list of practices that can reduce the chance of fire while soil sampling.
Fire suppressing items to keep in your soil sampling rig
Remember that most fires start under the truck where straw or chaff accumulates on exhaust pipes, mufflers, etc. Your firefighting equipment needs to be long enough to reach these areas if a fire does start.
Practices to reduce fire risk before one starts