Soil Sensors: Helpful Gadgets or Hapless Gimmicks?

This article originally appeared in the AGVISE Laboratories Winter 2024 Newsletter.

A number of new handheld sensors have hit the market, claiming to accurately and precisely measure soil nutrient content in the field, similar to traditional wet chemistry analysis at a soil testing laboratory. The draw for any person soil sampling is the ability to receive soil analysis results right in the field in real time. We know that our clients have a lot of questions about these types of sensors because we are getting these questions too. For almost 50 years, AGVISE has been an early adopter and innovator of new technologies in soil and plant analysis, and these new soil sensors are among the newest to gain popular attention in agriculture.

First, handheld sensors in general are nothing new for soil analysis. There are a number of handheld pH and electrical conductivity (EC) sensors available on the market that are often used for assessing and mapping environmental sites for reclamation and remediation projects. The environmental consultants still need to collect field soil samples and send them to the laboratory for calibration and validation in their official reports. The handheld sensors are used to help them assess the site size and variability.

Second, the type of sensor for the intended soil nutrient or property for measurement is important. After all, you should not try to measure something that the sensor cannot detect, right? The new handheld soil nutrient sensors often rely on near-infrared (NIR), mid-infrared (MIR), or X-ray fluorescence (XRF) spectroscopy methods. These technologies have long existed as benchtop instruments in analytical laboratories for various applications, and each method has its strengths and limitations.

For example, NIR spectroscopy is widely used in feed and forage analysis, food processing, and even meat science. The American Society of Agronomy compiled an 800-page book on NIR applications in agriculture (https://doi.org/10.2134/agronmonogr44.c10). There is one chapter on soil analysis at the end of the book. The strengths of NIR for soil analysis include soil organic matter, total carbon, organic carbon, organic nitrogen, and even pH. However, it does not perform well for nitrate-N, P, K, sulfate-S, Ca, Mg, Na, Cu, Fe, Mn, Zn, or soluble salts (EC). Simply put, NIR fails at measuring the actual soil nutrients we are trying to manage! This is why we do not use benchtop NIR for any soil analyses at AGVISE, let alone a handheld unit with less accuracy or precision. You might see handheld NIR sensors being used for some things, but you will not see them replace soil sampling or soil nutrient analysis soon.

Third, the handheld sensor outputs are often correlated and converted, in the end, to traditional wet chemistry analysis methods, like Bray P, Olsen P, or ammonium acetate K. These are the plant-available soil test methods that we are all familiar with and have decades of soil test calibration research behind them, which allow us to make fertilizer guideline calculations from the soil test result. Whenever a correlation and conversion step takes place, this introduces error for any subsequent calculations, like fertilizer rates. It is important to know what is actually being measured versus what is being reported.

As new sensors hit the market, a person thinking about trying them should be asking a lot of questions. AGVISE is always evaluating new analysis technologies, which can help us do a better or faster job while providing high-quality data to our clients. The questions outlined above are those that we use when we evaluate new analysis technologies for our own operation, and we hope the same questions can help guide you through the gamut of new soil sensors too.

Sticky Wet Soils? Try Adding a WD-40 Holster

This article originally appeared in the AGVISE Laboratories Fall 2024 Newsletter.

Do you have challenges collecting good quality soil cores in sticky wet soils? You are not the only one! WD-40 has been the soil probe lubricant of choice for over 30 years to help obtain better quality soil samples. University researchers have also tested WD-40 and found it does not contaminate soil samples.

Spraying WD-40 on your soil probes with the spray cans can get messy inside the pickup cab. A smart idea to make the WD-40 application process simpler and cleaner is making a WD-40 holster with some PVC pipe. The PVC pipe holster lubricates the soil probe with WD-40 between each soil core and also keeps the soil probe within easy reach. The clever idea came from a client who had spent too much time fiddling with WD-40 spray cans and losing them underneath the pickup seat.

The WD-40 holster is made from 2-inch diameter PVC pipe with a cap glued on the bottom and a threaded fitting on the top with a screw-in plug for storage when not in use. The PVC pipe should be fastened so that the open end faces the soil sampler and the soil probe can be easily placed into the pipe. Fill the PVC pipe with about 3-4 inches of WD-40 in the bottom. With the PVC pipe opening near the hole in the pickup floor, any excess WD-40 drops coming off the soil probe will go down the hole and reduce the mess of spraying WD-40 in the pickup cab.

Winter Soil Sampling: You Need the Right Tools

Snowfall in late October and November slowed harvest and soil sampling across the region. This means some fields will be soil sampled in December and maybe January as harvest for late-season crops continues in the snow.

The right equipment is the key to any project, and winter soil sampling is no different. AGVISE heavy-duty (HD) chromoly soil probes were designed for hard, frozen soil conditions. Chromoly steel is much tougher than stainless steel, and it handles the stress of sampling frozen soil. To punch through several inches of frost, you will also require additional weight. Most soil sampling trucks have the hydraulic cylinder mounted inside the truck cab, where you can take advantage of the entire truck weight to push through the frost. This enables you to take soil samples through 4 to 6 inches of frost on most medium- and fine-textured soils in winter. For receiver hitch-mounted hydraulic cylinders, you will need to add extra weight in the truck box, and it may limit you to pushing through only 1 to 3 inches of frost.

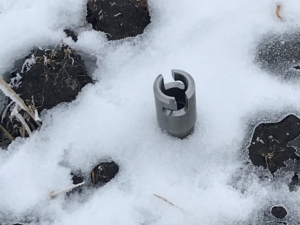
AGVISE offers wet and dry soil probe tips for the HD chromoly soil probe. The wet soil probe tip is best suited for frozen soils. The HD chromoly soil probe is available with or without a slot.

You can view examples of in-cab and receiver hitch-mounted hydraulic soil sampling systems on our website (https://www.agvise.com/installed-soil-sampling-kit-examples/). You can also find videos of soil sampling in frozen soils with the HD chromoly soil probe and wet soil probe tip.

Probe stuck in the ground? Don’t let it wreck your day.

If you have ever had a soil probe come off while in the ground, you have experienced a rare but stressful event!

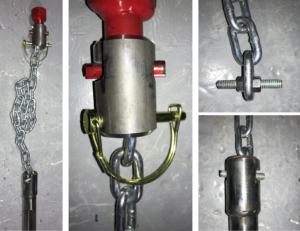
A customer recently called with this situation and a success story about how he recovered the soil probe “MacGyver” style.  I think his solution involved barb wire, duct tape and some chewing gum.  While a soil probe with quicktatch collar can come off the roll pin on the cylinder shaft, it is very rare.  If you have had that happen to you, you may have used a shovel to dig the probe out or pulled it out with some other MacGyver device you created.  In the winter with frozen soil, your options are more limited.  We wanted to give others who may experience this rare event an idea to create your own “probe puller” if this happens to you.  The materials you need are an extra quicktatch collar, snap pin or small bolt, short chunk of light chain, and another bolt with two nuts.   Here are some pictures to show you the probe puller we “MacGyvered” with stuff laying around the shop (sorry no duct tape or chewing gum involved).  I am sure several of you may have come up with even simpler/better designs for this life-saving device.  We would love to see other designs to share with customers who need to create a device that will save the day for poor samplers who find themselves in this situation!

Tips for Soil Sampling in Dry Conditions

Soil sampling in dry conditions can be difficult. The ground is hard, fields are dry, and getting a consistent soil core depth can take more time than usual. To help you take the best soil samples this fall, we’ve put together some tips and tricks for sampling in dry soil conditions that, when implemented, will help you save time and frustration in the field.

Soil sampling equipment

AGVISE Laboratories has provided soil sampling equipment for over 40 years. Our hydraulic soil sampling system will enable you to get high-quality soil cores, even in hard, dry soils. The electric-hydraulic power unit paired with easy-to-change Quicktach probes will make adapting to challenging soil sampling conditions simple and easy. You can find more about our equipment on our online store.

Best soil probe body

The heavy-duty (HD) probe body is made from chromoly steel. This thick-walled, hard steel probe body will resist bending under hard, dry, or frozen soil conditions (compared to softer stainless steel). The HD probe body comes in two options: solid and slotted. If the topsoil is powder dry, it is best to use the HD solid probe body, as powder-dry soil may fall out of the slot. Stainless steel probe bodies work great in most situations but in hard, dry soils the stainless-steel probe body may bend more easily than the HD probe body.

Best soil probe tip

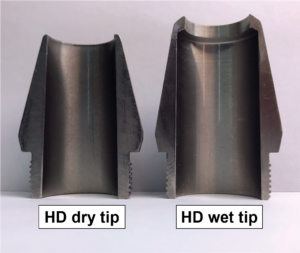
AGVISE Laboratories carries two tips for the HD probe body. The HD “dry tip” has a sharp cutting edge and large opening (3/4-inch) that works great in hard, dry soils. It is our leading recommendation for such conditions. If you are soil sampling fine-textured clay soils, even under dry conditions, the HD “wet tip” may also work well for you because there is usually a little moisture remaining at the lower end of the 24” soil profile. It is a good idea to have both the HD dry and HD wet tips with you in the sampling rig. As soil conditions change, you can use the soil probe tip that gives you the best quality soil cores. 

Solving common very dry soil sampling problems

What do I do if the soil probe comes up empty?

Under very dry soil conditions, sometimes the soil probe comes up empty because soil falls out the bottom of the probe. One trick to overcome this is to push the probe all the way to 24-inch (or to the end of its cycle), then lift the probe up a few inches and push it back down to 24-inch. This creates a slight plug at the bottom of the soil core that prevents soil from falling out the bottom. It seems like such a simple solution, but it works!

What if I can’t get full 24-inch soil cores and the soil probe tip has a hard plug in it, which is preventing soil from flowing into the probe body?

You are probably using a tip with an opening diameter that is too small. Dry soil does not compress well and sometimes it will not flow through a smaller tip opening. The HD dry tip has a 3/4-inch that is large enough to allow dry soil to flow into the soil probe.

Will WD-40 help me get better quality soil cores if the soil is dry and hard?

There is no benefit to using a lubricant such as WD-40 under very dry soil conditions. Dry soil is much less likely to plug the soil probe than wet soil. If you are running into a few plugged tips with the HD dry tip, try the HD wet tip. You are probably finding a layer of wet soil deeper in the soil profile. The HD wet tip has a recessed lip that will prevent plugging and will handle this layer better than the HD dry tip.

What if I can’t get a full 6-24-inch soil core? Should I change anything in the information I submit to the laboratory? 

If you are unable to get a full second soil depth (6-24-inch soil core), it is important that the information you submit to the laboratory matches the soil depth you actually collected. Mobile soil nutrients like nitrate-nitrogen are tested on the second soil depth and results are calculated based on soil core length. If the soil core is shorter than what was written on the submission form or submitted in AGVISOR, the soil test nitrate-nitrogen result will be overestimated.

Preventing fires when soil sampling

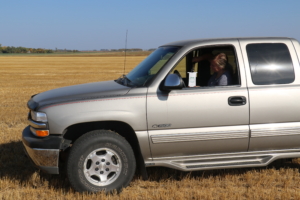
No one wants to start a fire while in the field. Unfortunately, driving anything with an engine over dry crop residue creates a fire risk. John Lee, soil sampling and testing veteran, has seen this happen firsthand. “I started a corn stalk field on fire when I was soil sampling one of my dad’s fields in college,” said Lee. “The fire was put out quickly, but I was embarrassed that I did not have anything in the truck with me to put the fire out.”

After visiting with several customers with many years’ experience soil sampling in dry conditions, we compiled a list of practices that can reduce the chance of fire while soil sampling.

Fire suppressing items to keep in your soil sampling rig

Remember that most fires start under the truck where straw or chaff accumulates on exhaust pipes, mufflers, etc. Your firefighting equipment needs to be long enough to reach these areas if a fire does start.

  1. Large ABC type fire extinguisher with hose
    • 10 lb size costs ~$70.00; large 20 lb size costs ~$130.00
  2. Water tank with 20-ft hose
    • A small water tank (~25 gallons) with a 20-ft hose will allow you to get to any location on the truck to put out a fire. One sampler suggested using a small spray tank system designed for ATVs. The systems cost roughly  $350-$450, are self-contained, and run from a battery. You may already have a small weed spraying system you can put in the box of your soil sampling truck to use as a firefighting system.

Practices to reduce fire risk before one starts

  1. Soil sample in the morning when it is cool and overnight dew is still present
  2. Talk with your clients about reducing stubble height. This should not be an issue with drought-stressed crops because the stubble height will be shorter than normal.
  3. Keep as much ground clearance under your truck as possible to prevent chaff buildup on the frame, axels, and crossmembers.
  4. Inspect your truck at the end of each day to make sure straw and chaff are not accumulating in places that could start a fire the next day. Use an air compressor to blow out all the nooks and crannies accumulating crop residue.
  5. Stay alert for any hints of smoke while soil sampling. At the first hint of smoke, find where the smoke is originating quickly and extinguish it, or get out of the field and into a safe area to figure out where the smoke is coming from.

Preparing for Spring Soil Sampling

Even when fall soil sampling weather cooperates, there is always some soil sampling to do each spring. No matter the spring conditions, the soil sampling window is tight if you are planning to collect soil samples and get the soil test results back in time for spring fertilizer decisions. You will want to pull soil samples before the field will carry a pickup truck, without leaving deep ruts, to maximize the spring soil sampling window. Your soil sampling rig choices are usually walking the field with a hand soil probe or using an ATV/UTV.

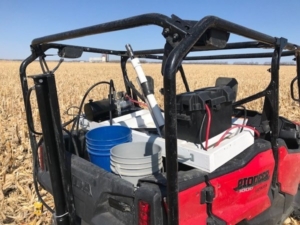
Over the years, many creative clients have outfitted UTVs with hydraulic soil sampling equipment to collect 24-inch soil cores in the spring. This has allowed soil samplers to get into a field about one week before it could carry a pickup truck. It is a big deal if you can get soil test results back one week sooner in the spring!

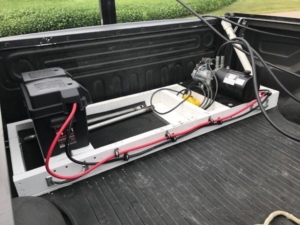
It is fairly simple to rig a UTV with the receiver hitch-mounted hydraulic soil sampling system kit. All you need to build is a wooden box to hold the electric-hydraulic power unit and a large starter battery. The hydraulic cylinder is mounted on a channel iron, which simply attaches to the receiver hitch. A large starter battery has enough charge to complete a good day of soil sampling without a recharge. Just make sure you put the battery on the charger overnight.

Some clients have created hydraulic soil sampling systems that can be quickly added and removed from a pickup truck box or UTV. It is a quick and easy add-on for the couple weeks of spring soil sampling that you may do. If you want some simple designs for self-contained soil sampling systems that can be removed in 10 minutes or less, these are some examples to consider.


Once the soil sample is collected, the next step in successful spring soil testing is getting them analyzed ASAP. AGVISE Laboratories knows that every spring soil sample is a rush, and our normal turnaround time is next-day (24 hours after soil sample is received). If you need any soil sampling equipment or supplies, we have everything in stock to ensure you get spring soil testing completed on time. We know spring soil testing can be stressful, but we hope to make it easier with the right soil sampling equipment and the reliable soil testing services that AGVISE has provided since 1976.